|
Beaded
Fringe Main Project Page
View Our Beaded Fringe Collections
Decorating Studio Home Page
Click on a Beaded Fringe Project/Craft name below
for easy instructions on how to start your beaded trim project:
Tablecloths
/ Pillows
/ Sheers
/ Cornice
Boards / Valances
/ Sachets
/ Nightlight
/ Placemats
/ Lampshades
/ Ottoman
/ Bench
/ Planters
/ Bedspread
or Duvet / Throw
/ Shower
Curtain / Vanity
bottle /
Guest & Hand towels / Shelves
/ Door
Frames / Hammocks
/
Patio Umbrellas / Shawl
or Evening Wrap / Bathing
suit / Skirt
or Dress / Capri's
or Pants / Ankle
Bracelet /
Barrettes / Boots
/ Back Pack
/ Beach
Hat
General Tips When
Using Beaded Fringe Trim On Your Projects
Create A Beaded Fringe Guest or Hand Towel
View DecoratingStudio's
Beaded Fringe Collections
An absolute treat for your guests!
Tips
- Definitely use acrylic beaded fringe, not glass beads for this project.
How To Instructions
- Purchase a small hand or guest towel in a color that compliments your Guest
Bathroom.
- Measure along the bottom edge of the towel, where you will attach the beaded
fringe. This is how much fringe you will need, plus an extra 2" to allow
you to fold and securely stitch the 2 cut ends of the ribbon down.
- Select a beaded fringe that compliments the colors in your Guest Bath as
well as the Guest Towel.
- Securely pin the beaded fringe in place from one bottom edge of the towel
to the other.
- Stitch the ribbon part of the beaded fringe onto the towel.
- Neatly fold, place on the vanity or hang by the sink!
General Tips When Using Beaded Fringe Trim
On Your Projects
- Some beaded fringe is made of acrylic and some of glass.
The new acrylic beaded fringes have the sparkle of glass without the weight
or the worry of breakage. Either is fine, however, some applications should
definitely use acrylic beads due to the danger of breakage with glass beads.
All of DecoratingStudio.com beaded fringe is made of a high quality, crystal
clear acrylic.
- Often, the stated length of beaded fringe will include the
tape or ribbon at the top. If length is critical, double check to see if the
ribbon is included in the length dimension or not. All of Decorating Studio's
stated beaded fringe lengths include the top ribbon or tape in the dimension.
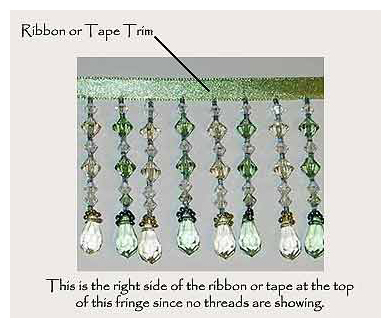 There
are no right sides or wrong sides as far as the beaded part of beaded fringe
goes; however sometimes, one side of the ribbon or tape holding the beads,
may show the threads that are holding the beads to the ribbon. If the ribbon
or tape part of your fringe has threads showing on one side, you should attach
it to your projects so that the threads are down, hidden from view. There
are no right sides or wrong sides as far as the beaded part of beaded fringe
goes; however sometimes, one side of the ribbon or tape holding the beads,
may show the threads that are holding the beads to the ribbon. If the ribbon
or tape part of your fringe has threads showing on one side, you should attach
it to your projects so that the threads are down, hidden from view.
- If you are applying your beaded fringe to an object with
glue, use a non-toxic, craft glue that dries clear and flexible. We recommend
Aleene's Original Tacky Glue. You may want to secure the ribbon or
tape to the item with straight pens until the glue dries to assure that the
fringe doesn't slip out of place while drying.
- When applying beaded fringe with glue, it is helpful to first
lay the ribbon or tape trim of the fringe on the item on which you are gluing
it, then take a pencil and lightly mark the width of the ribbon on the item.
This will assure that you have covered the area where the ribbon or tape will
be with enough glue to secure the ribbon or tapes edges.
- When you are attaching beaded trim to an object that will
get wet or requires washing, generally you will want to stitch the ribbon
on instead of gluing, however, if you are attaching it to a glass or hard
object that will get wet, use a suitable clear waterproof glue. These types
of glues are often toxic, so use carefully and never on eating utensils.
- If you are attaching your beaded trim with a sewing machine,
make sure that the beads are clear of the foot pedal, to eliminate breakage.
- Most beaded fringe has a decorative ribbon at the top, to
which the beads are attached. In most cases, the ribbon is attractive enough
to show. If you want another type of trim over the ribbon, you can easily
attach a more decorative ribbon, braid or gimp over the beaded fringes' ribbon
once you complete attaching the fringe.
- Never leave the ribbon or tape edge of the fringe exposed.
Always allow a little extra so that you can turn the edge into a fold and
secure with glue or thread.
- When measuring a round or oval object to determine how much
fringe will be needed for a project (such as a lampshade edge), it is helpful
to use a cloth tape measure and straight pins to secure it in place as you
are measuring.
- While working on your project, if you find that midway through
your beaded fringe one of the fringes is missing, cut one beaded fringe from
the edge (with the ribbon or tape at the top) and sew it to the fringe area
that is missing the beads.
View
Decorating Studio's Beaded Fringe Collections
Click on the Project/Craft
name below for instructions on how to make:
Tablecloths
with Beaded Fringe / Pillows
with Beaded Fringe / Sheers
with Beaded Fringe / Cornice
Boards with Beaded Fringe / Valances
with Beaded Fringe / Sachets
with Beaded Fringe /
Nightlight with Beaded Fringe / Placemats
with Beaded Fringe / Lampshades
with Beaded Fringe / Ottoman
with Beaded Fringe / Bench
with Beaded Fringe / Planters
with Beaded Fringe / Bedspread
or Duvet with Beaded Fringe / Throw
with Beaded Fringe /
Shower Curtain with Beaded Fringe / Vanity
bottle with Beaded Fringe /
Guest & Hand towels with Beaded Fringe / Shelves
with Beaded Fringe / Door
Frames with Beaded Fringe / Hammocks
with Beaded Fringe /
Patio Umbrellas with Beaded Fringe / Shawl
or Evening Wrap with Beaded Fringe / Bathing
suit with Beaded Fringe / Skirt
or Dress with Beaded Fringe / Capri's
or Pants with Beaded Fringe / Ankle
Bracelet with Beaded Fringe /
Barrettes with Beaded Fringe / Boots
with Beaded Fringe / Back
Pack with Beaded Fringe / Beach
Hat with Beaded Fringe
Beaded
Fringe Main Project Page
Beaded Fringe Collections
Decorating Studio Home Page
|


