|
Easy & Elegant Wedding Favor Project!
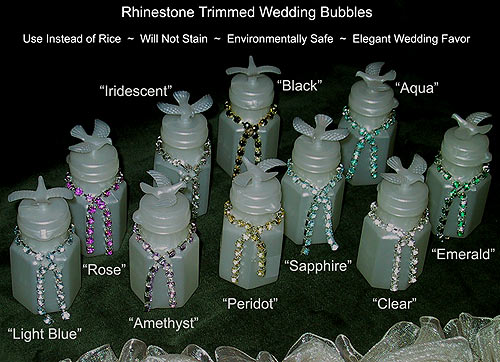
Rhinestone Bubble Bottle Wedding Favors to make yourself.
It's a special day - shouldn't even the Wedding Bubble bottles be special?
"Long Rhinestone Bow" Design shown above - 2 other design ideas pictured below.
Elegant rhinestone wedding bubble bottles are easy to make using standard sized .6 oz Wedding Bubble bottles! Each stone on our trim is individually set - but, it only looks expensive and so unique for your special day.
Choose your color rhinestone trim (we have 11 fabulous colors pictured below) and follow our simple instructions. There are 3 different designs for you to choose from, so you can really make your wedding bubble bottles unique and a beautiful favor that your guests will always treasure. We have even figured out exactly how many yards of rhinestones you need depending on the style of Rhinestone wedding bubble bottles that you would like as wedding favors that nobody has ever seen before!
It's quick, easy & fun - Your special day just became a little more special!

Above: Detail of Rhinestone Choker Design
Directions below for Choker / Short Bow / Long Bow
Project Instructions to make Rhinestone Wedding Bubble Bottles
All you'll need to make your Wedding Bubble Bottles are:
-
standard sized (.6 oz) bubble bottles - purchase at Michael's, etc. or online
-
craft glue (we love Tacky Glue because it dries clear, quick & strong)
-
Scissors & ruler
-
Rhinestone trim in the color (or colors) of your wedding
Directions for Choker / Short Bow / Long Bow
Tip:
The standard sized bubble bottle that we used in the photo is 2 3/4" around the neck. Make sure that your bottle is the same. If not, make allowances in the length of the rhinestone trim you cut for each bubble bottle.
Rhinestone "Choker" Instructions:
10 yard bolt of Rhinestone trim will do 130 standard .6 oz bubble bottles.
-
Cut one rhinestone strip at 2 3/4" and verify that this is the correct length for your sized bubble bottle. After making sure that you have the correct length to use as a pattern, go ahead and cut your rhinestone trim for each bubble bottle.
-
It is easiest to do a dozen at a time. So, lay 12 of the bubble bottles on their side and put a small amount of craft glue (make sure it is glue that dries clear - we love Tacky Glue) on the back of the neck of each bottle (see picture).
-
Take your rhinestone strips and lay the center of the strip in the glue on the back of the neck. Make sure that the rhinestone strip is centered and the same amount hangs down on each side of the bubble bottle (see picture).
-
Do all 12 bubble bottles and wait about 10 minutes for the glue to set up a little.
-
Once the glue has set up a little (but is still adjustable in case you need to slide the rhinestone trim around a little) pick up a bubble bottle and apply a little glue to the front (opposite side where you put the glue before) of the neck.
-
Pull each loose side of the rhinestone strand up and gently press end into the glue so that the ends meet (see picture). Note: if you are using a glue that dries clear - such as Tacky Glue - you will not be able to see the glue once it dries.)
-
Let dry for at least 12 hours before handling your one of a kind Wedding Bubble Bottles!
"Short Rhinestone Bow" Instructions:
10 yard bolt of Rhinestone trim will do 85 standard .6 oz bottles.
-
Cut one rhinestone strip at 4 1/4" and verify that this is the correct length for your sized bubble bottle (neck of bottle should be 2 3/4" for this length). After making sure that you have the correct length to use as a pattern, go ahead and cut your rhinestone trim for each bubble bottle.
-
It is easiest to do a dozen at a time. So, lay 12 of the bubble bottles on their side and put a small amount of craft glue (make sure it is glue that dries clear - we love Tacky Glue) on the back of the neck of each bubble bottle (see picture).
-
Take your rhinestone strips and lay the center of the strip in the glue on the back of the neck. Make sure that the rhinestone strip is centered and the same amount hangs down on each side of the bubble bottle (see picture).
-
Do all 12 bubble bottles and wait about 10 minutes for the glue to set up a little.
-
Once the glue has set up a little (but is still adjustable in case you need to slide the rhinestone trim around a little) pick up a bottle and apply a drop of glue to the center front (opposite side where you put the glue before) of the neck.
-
Pull one side of the rhinestone strand up, gently pull taunt and press the strand into the glue (see picture).
-
Put another drop of glue on top of rhinestone strand (right over where you put the other drop) and then pull the other side of the rhinestone strand up and cross over the first strand. Press strand into the glue. Note: if you are using a glue such as Tacky Glue which dries clear - you will not be able to see the glue once it dries.)
-
Let dry for at least 12 hours before handling your stunning Wedding Bubble Bottles!
"Long Rhinestone Bow" Instructions:
10 yard bolt of Rhinestone trim will do 65 standard .6 oz bottles.
-
Cut one rhinestone strip at 5 1/2" and verify that this is the correct length for your sized bubble bottle (neck of bottle should be 2 3/4" for this length). After making sure that you have the correct length to use as a pattern, go ahead and cut your rhinestone trim for each bottle.
-
It is easiest to do a dozen at a time. So, lay 12 of the bubble bottles on their side and put a small amount of craft glue (make sure it is glue that dries clear - we love Tacky Glue) on the back of the neck of each bottle (see picture).
-
Take your rhinestone strips and lay the center of the strip in the glue on the back of the neck. Make sure that the rhinestone strip is centered and the same amount hangs down on each side of the bottle (see picture).
-
Do all 12 bottles and wait about 10 minutes for the glue to set up a little.
-
Once the glue has set up a little (but is still adjustable in case you need to slide the rhinestone trim around a little) pick up a bottle and apply a drop of glue to the center front (opposite side where you put the glue before) of the neck.
-
Pull one side of the rhinestone strand up, gently pull taunt and press the strand into the glue (see picture).
-
Put another drop of glue on top of rhinestone strand (right over where you put the other drop) and then pull the other side of the rhinestone strand up and cross over the first strand. Press strand into the glue. Note: if you are using a glue that dries clear - such as Tacky Glue - you will not be able to see the glue once it dries.)
-
Let dry for at least 12 hours before handling your elegant Wedding Bubble Bottles!
|


